
Breakfast & Brunch
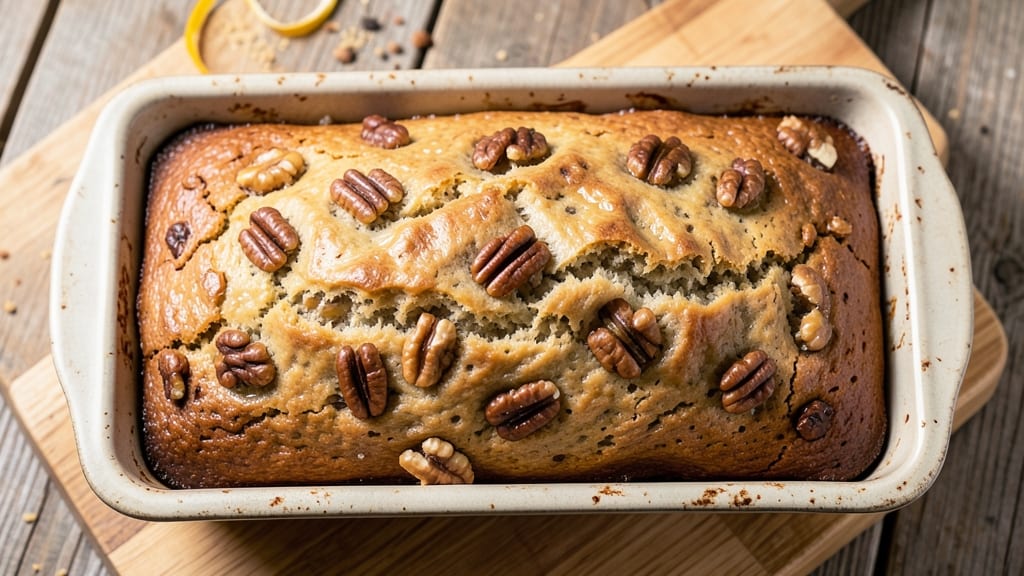
This 6-ingredient banana bread recipe delivers ultra-moist crumb and tender texture without any fuss—perfect for using up overripe bananas. The secret lies in the right flour-to-banana ratio and a touch of oil that keeps every slice soft for days.
I’ve baked this version countless times, and it never disappoints, even when I forget to check the oven. What makes this recipe special is its simplicity: just six ingredients combine in a single bowl, with no mixing required beyond basic stirring.
The walnut streaks add subtle crunch and visual appeal, though you can omit them if you prefer classic banana bread. Baking at 350°F for 50–60 minutes ensures a golden crust and a perfectly domed loaf.
The result is a loaf that’s moist, not dense, with a gentle sweetness from the bananas and just enough richness from the oil. Each slice stays fresh-tasting for days, making it ideal for breakfast, snacks, or gifts.
The crust stays soft, never dry, thanks to the baking soda’s gentle lift. For extra flavor, fold in chocolate chips or cinnamon, but the core recipe stands strong on its own. Let’s get baking—this banana bread is foolproof for beginners and satisfying for anyone who loves a tender crumb.
Ingredients for 6 ingredient banana bread
Six simple ingredients transform overripe bananas into ultra-moist banana bread with perfect walnut streaks.
| Ingredient | Amount | Notes |
|---|---|---|
| Ripe Bananas 🍌 | 2 cups | Mashed, overripe preferred |
| All-Purpose Flour 🌾 | 1 ½ cups | Sifted for even texture |
| Granulated Sugar 🍚 | ¾ cup | White or light brown |
| Vegetable Oil 🫒 | ½ cup | Light or canola preferred |
| Baking Soda 🧂 | 1 tsp | Pure, not baking powder |
| Walnuts 🥜 | ½ cup | Chopped, optional for streaks |
The bananas are the star—overripe and speckled with brown means more natural sweetness and moisture. Trader Joe's or local produce markets often have the best selection of ripe bananas, especially if you ask for ones with brown spots. If you can't find perfectly ripe ones, place them in a paper bag overnight to speed up the ripening. The walnuts? Costco or bulk bins offer the best price per pound. Toast them first for deeper flavor—5 minutes in a dry pan until fragrant. For the flour, King Arthur brand is my go-to for consistent results, but any all-purpose will work.
No walnuts? Skip them entirely—this recipe still shines as classic banana bread. Short on baking soda? Baking powder at 1.5 tsp works in a pinch, but the texture won't be quite as tender. The oil can be swapped for melted butter (same amount), though it adds a slightly richer flavor. If your bananas are less ripe, boost the sugar to 1 cup for balance. For extra moisture, fold in 2 tbsp yogurt—plain or vanilla. And if you're worried about the bread being too sweet, reduce the sugar to 0.5 cup and add 1 tsp cinnamon for warmth.
This loaf keeps beautifully—wrapped in foil at room temperature for 2 days or in the fridge for up to 5 days. For longer storage, freeze slices individually—they thaw perfectly in the microwave. The walnuts stay crisp for about 3 days if stored separately, so add them fresh when serving. I always bake this in a 9x5-inch loaf pan for that classic shape, but a 8x4-inch pan works too—just bake 10-15 minutes longer. The bread tastes even better the next day as the flavors meld, so make a double batch if you can—it disappears fast.
Why You'll Love This Recipe
- No-Fuss Mixing: I swear, this comes together faster than my morning coffee. Mash those bananas—no peeling required—then stir in the dry ingredients. No eggs, no butter, no fuss. The oil keeps it moist without extra effort, and the baking soda does all the rising work.
- Sweet Spot Balance: That caramelized banana flavor? Chef’s kiss. The sugar enhances the natural sweetness of the ripe fruit, while the flour gives it just enough structure to hold its shape. It’s not too dense, not too cakey—just perfectly there.
- Breakfast or Snack: Honestly, I make this for breakfast, lunch, or when I crave something sweet at 3 PM. Slice it thick for a hearty morning treat or grab a small piece to toss in a lunchbox. The texture stays great even after a day or two—no sad, dry bread here.
- Pantry Staple Magic: Between us, this recipe uses things you already have. Overripe bananas that’d otherwise go to waste? Turned into gold. A cup of sugar, a splash of oil, flour, and baking soda—that’s it. Budget-friendly, zero-guilt, and always delivers. (Yes, even on a Tuesday night.)
Step-by-step instructions for 6-Ingredient banana bread
Here's how to create a perfectly moist banana bread with just six ingredients and minimal effort.
Prep the Ingredients for Even Mixing
Start by mashing the 2 cups of ripe bananas directly in a large mixing bowl using a fork or potato masher. You want them completely broken down with no large chunks remaining—this ensures smooth texture throughout the bread. If your bananas aren't quite ripe enough, microwave them for 30 seconds to soften them first.
In a separate bowl, sift the 1.5 cups of all-purpose flour to aerate it and remove any lumps. This prevents dense pockets in your finished bread. Set both bowls aside—the flour will be added last to maintain the right texture. The baking soda should remain in its original container until needed.
Combine Wet Ingredients for Maximum Moisture
To the mashed bananas, add the 0.75 cup of granulated sugar and 0.5 cup of vegetable oil. Mix these together thoroughly until the sugar dissolves completely and the oil is fully incorporated. The mixture should be smooth and well-combined, with no streaks of oil remaining. This step is crucial for creating that signature ultra-moist texture—don't skip it.
The oil acts as both a tenderizer and moisture retainer, while the sugar helps balance the natural sweetness of the bananas. If your mixture looks too thick at this stage, don't worry—it will loosen up when the flour is added. I like to press down on the mixture with a spoon to check consistency; it should be thick but still pourable.
Incorporate Dry Ingredients and Walnuts
Create a well in the center of the wet mixture and add the 1 teaspoon of baking soda. Gently fold this in using a spatula, being careful not to overmix. The baking soda will react immediately with the bananas' natural acids, creating tiny bubbles that help lighten the bread. Add the 0.5 cup of chopped walnuts at this stage if you're using them, distributing them evenly throughout the batter.
Now gradually add the sifted flour to the mixture, folding it in just until combined. You'll notice the batter will thicken significantly as the flour absorbs the liquid. Stop mixing as soon as the flour disappears—overmixing develops gluten and can make the bread dense. The ideal consistency should be like a thick pancake batter that holds its shape when spooned.
Bake Until Golden and Springy
Preheat your oven to 350°F and grease a 9x5-inch loaf pan thoroughly with butter or nonstick spray. Pour the batter into the prepared pan and smooth the top with a spatula. If you're using walnuts, press a few additional pieces on top for decorative streaks. Bake for 50-60 minutes until a toothpick inserted in the center comes out clean and the top springs back when pressed gently.
Here's the key to perfect moisture: I always tent the loaf pan with aluminum foil after 30 minutes of baking. This prevents the top from drying out while allowing the bottom to continue cooking. The bread is done when the edges pull away slightly from the pan and develop a golden-brown crust. Let it cool in the pan for 10 minutes before transferring to a wire rack to cool completely.
Check for Moisture Perfection
Once completely cooled, slice the banana bread to check its texture. The interior should be soft and moist with just a slight crumbly texture—no dry spots or dense areas. If the bread seems too dry when cool, it likely needed a few more minutes in the oven. For maximum moisture, store leftovers wrapped tightly in plastic wrap or in an airtight container in the refrigerator for up to 5 days.
This recipe delivers consistently moist banana bread because we're using ripe bananas for natural sweetness and oil for moisture retention. The baking soda creates lift, while the flour provides structure without overpowering the banana flavor. Each slice should be tender with just the right balance of sweetness and nutty streaks from the walnuts.
Pro Tips For Making 6 Ingredient Banana Bread
- Mash Bananas Thoroughly: I learned this the hard way—lumpy banana bread is a crime. Use a fork first to break up the fruit, then press through a fine-mesh sieve or push through a ricer for the smoothest texture. No food processor? A potato masher works, but you’ll need to work harder to eliminate chunks.
- Weigh Your Flour: That scoop-and-sweep method? It’s the reason your bread might turn out dense. Use a kitchen scale and measure flour by weight (about 200g for this recipe) for consistent results. Spooning flour into the cup and leveling with a knife is better, but weighing it guarantees you’re not packing it too tightly.
- Check Doneness with a Toothpick: The oven light isn’t your friend. Insert a toothpick into the center—if it comes out clean or with a few moist crumbs, it’s done. If batter clings, bake 5–10 more minutes. Overbaking dries out the bread, and underbaking leaves it gummy. Trust the toothpick, not the timer.
- Swap Oil for Melted Butter: Vegetable oil keeps things moist, but melted butter adds depth. Use the same amount (about 1/3 cup), but let it cool slightly before mixing—hot butter can kill the baking soda’s lift. The flavor difference is noticeable, and the crumb gets a subtle richness. (Yes, even if you’re impatient like me.)
Storing and reheating this recipe
Room Temp Storage
Banana bread stays fresh at room temperature for 2 days when wrapped tightly in plastic wrap or aluminum foil. I like using Saran Wrap because it clings snugly to the loaf’s shape.
Place it on a wire rack first to prevent sogginess from condensation. For extra protection, I sometimes add a paper towel between layers if storing multiple slices. 🌾
Fridge Preservation
Extend freshness to 5 days by refrigerating in an airtight container—I use Glasslock containers for their tight seals. Store the bread on the middle shelf where temperature is most stable.
The cold slows moisture loss, keeping slices soft. If you notice the crust drying out, sprinkle a few drops of water on it before rewrapping to restore moisture.
Freezer Magic
Freeze individual slices for up to 3 months—this is my go-to for meal prep. Wrap each slice tightly in plastic wrap, then place in a freezer bag to prevent freezer burn. Label with dates!
To reheat, microwave for 15-20 seconds—the walnuts stay crisp, and the bread regains its warmth without drying out. For oven reheating, bake at 300°F for 8-10 minutes until heated through.
Reviving Stale Bread
If your banana bread dries out, don’t toss it! Slice and toast in a 350°F oven for 5-7 minutes with a pat of butter on top. The heat reactivates the moisture, and the butter adds richness.
For a quick fix, sprinkle slices with water, cover with a damp paper towel, and microwave for 10 seconds. This works especially well for the walnut-streaked version.
Portion Control
Prevent waste by cutting the loaf into 12 equal slices before storing. Use a serrated knife for clean cuts, and store slices in a single layer in the freezer to maintain texture.
For serving, I often wrap individual slices in parchment paper before placing them in a lunchbox—this keeps them fresh for up to 24 hours** outside the fridge. 🍞
Nutrition facts
Frequently asked questions
Can I use unripe bananas in this recipe?
Not ideal for maximum moisture! Overripe bananas with brown spots are perfect—they're sweeter and create that signature tender crumb. If your bananas aren't ripe enough, microwave them for 30 seconds to soften first. For unripe bananas, increase the sugar to 1 cup to balance the flavor.
What if I don't have walnuts?
No problem! Skip them entirely—the core recipe still delivers ultra-moist banana bread. For alternatives, try chopped pecans, chocolate chips, or even blueberries (fold in gently). The walnuts just add subtle crunch and visual appeal, but aren't essential.
Why did my banana bread turn out dense?
Overmixing is usually the culprit! Stop folding the flour in as soon as it disappears—overmixing develops gluten, making the bread tough. Another common mistake is underbaking: always check with a toothpick until it comes out clean. For extra moisture, try adding 2 tbsp yogurt to the batter.
Can I make this recipe gluten-free?
Yes, but with adjustments! Replace the all-purpose flour with a 1:1 gluten-free baking flour blend (like Bob's Red Mill). You may need to add 1 tsp xanthan gum to improve texture. Also reduce other liquids slightly—gluten-free batters tend to be thicker.
How do I know when it's fully baked?
Three tests: 1) A toothpick inserted in the center should come out clean (no wet batter). 2) The edges should pull away slightly from the pan. 3) The top should spring back when pressed gently. If unsure, bake 5-10 minutes longer—banana bread is better slightly underdone than overbaked.