
Side Dishes
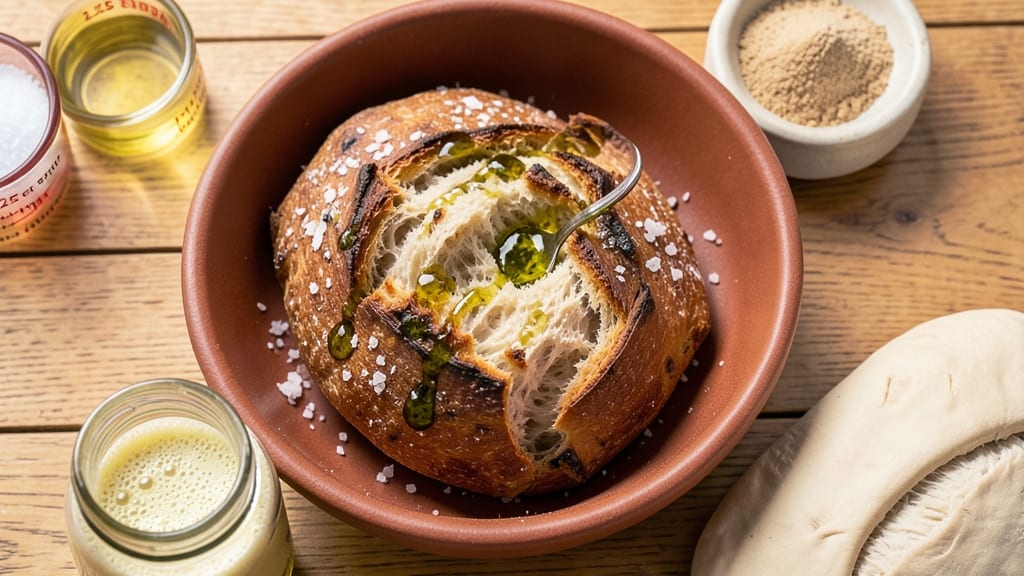
This artisan bread recipe transforms simple flour into a fragrant, flavorful loaf with every bite, thanks to its bold flavors. The secret lies in warm spice and herb infusions that create depth—think rosemary's piney aroma, black pepper's sharp kick, or garlic's savory warmth.
I've baked dozens of variations, and this method ensures a crisp crust, airy crumb, and bold flavor in every slice.
Starting with a basic dough, you'll incorporate flavorful additions like garlic, herbs, or seeds directly into the dough or as a topping before baking. The process is straightforward: mix, knead, let the dough rest, shape, proof, and bake with steam for that perfect oven-spring.
Traditional scoring techniques elevate both appearance and texture, while modern twists like sourdough starters or global spices add exciting variations.
What you'll achieve is a loaf with a golden, crackling crust and a tender, flavorful interior infused with your chosen spices or herbs. The aroma alone will fill your kitchen, and each slice will offer a satisfying crunch and rich taste.
This recipe delivers restaurant-quality bread with a homemade touch, perfect for serving with soups, sandwiches, or enjoying on its own.
Whether you're a beginner or an experienced baker, this method is foolproof and adaptable. The key is patience—allowing time for proper fermentation and proofing ensures the best results. Once you master this technique, you'll never buy store-bought bread again. Let's get started on creating your perfect loaf.
Ingredients for artisan bread recipe flavors
Transform simple flour into aromatic, flavor-packed artisan bread with these bold ingredients—each one essential for depth and texture.
| Ingredient | Amount | Notes |
|---|---|---|
| All-Purpose Flour 🌾 | 5 cups | High-protein preferred for structure |
| Active Dry Yeast 🍞 | 2 ¼ tsp | Fresh yeast at half the amount |
| Granulated Sugar 🍚 | 1 tbsp | Feeds yeast for activation |
| Salt 🧂 | 2 tsp | Diamond Crystal preferred |
| Warm Water 💧 | 2 ¼ cups | 105-110°F for ideal yeast activation |
| Extra-Virgin Olive Oil 🫒 | 2 tbsp | For dough elasticity |
| Fresh Rosemary 🌿 | ½ cup | Chopped finely for infusion |
| Black Peppercorns 🌶️ | 1 ½ tsp | Freshly cracked for intensity |
| Garlic Cloves 🧄 | 4 cloves | Minced for aromatic depth |
| Sesame Seeds 🌰 | ¼ cup | For topping crunch |
| Coarse Sea Salt 🧂 | 1 ½ tsp | For final crust enhancement |
| Cornmeal 🌽 | ½ cup | Prevents sticking during shaping |
| Ice Cubes ❄️ | 1 cup | For dough chilling |
The flour is your foundation, so King Arthur or Caputo are game-changers—their high gluten content creates that perfect chew. Yeast is non-negotiable: Saf-Instant or Red Star Active Dry both work, but test your yeast first (proof it in warm water with sugar—should foam in 5-10 minutes). For rosemary, farmers' market bundles have the freshest needles, but dried works too (use half the amount). The black peppercorns? Freshly cracked in a mortar releases oils that dried pepper can't match—trust me, it's worth the extra minute. Garlic should be peeled and minced just before mixing to preserve its bright flavor.
No fresh rosemary? Dried rosemary at one-third the amount works in a pinch, but the aroma won't be as vibrant. Substituting sesame seeds? Poppy seeds or everything bagel seasoning add different textures—just adjust the topping ratio. Running low on olive oil? Avocado or melted coconut oil keep the dough pliable, though olive oil's fruity notes elevate the flavor. For the garlic, garlic powder at half the amount is an option, but the fresh version's complexity is unmatched. And if you're gluten-sensitive, King Arthur gluten-free flour blend delivers surprisingly close results (though texture will differ).
This dough is a patient's game—let it rest 2 hours at room temperature after initial mixing, then refrigerate overnight for 12-16 hours to develop flavor. The longer it ferments, the better it tastes. For scoring, a razor blade or lame creates clean cuts, but a sharp knife works too. Bake in a Dutch oven with a lid for the first 20 minutes to trap steam, then finish uncovered. Store wrapped at room temperature for 3-4 days or freeze for up to 3 months—toasting revives stale slices beautifully. Leftovers? Toss them in a brown paper bag for 5 minutes to crisp up.
Why You'll Love This Recipe
- Five-Ingredient Magic: I swear, this is the kind of recipe where you glance at the list—flour, yeast, sugar, salt, water—and think, "How hard can it be?" Then you realize it’s actually how hard not to mess up.
- Crispy-Chewy Crunch: That golden crust with a pillowy center? It’s all in the steam and the slow rise. Honestly, the first time I nailed it, I called my mom just to say, "I did it—no baguette pan required."
- Weeknight Workhorse: Toss in a pinch of rosemary for dinner, a sprinkle of flaky salt for breakfast, or even freeze half for toast later. Between us, I’ve served this at book club, potlucks, and lazy Sundays—no one ever asks what’s in it.
- Pantry Staple Power: You already have everything. No specialty flours, no $10 yeast packets—just what’s sitting in your cabinet. And if you bake two loaves? You’ve got snacks for the week without breaking the bank.
Step-by-step instructions for warm spice and herb infused artisan bread
Here's how to craft bread with layers of aromatic complexity—where every bite delivers rosemary's piney brightness and peppercorn's warm kick.
Activate the Yeast with Warm Infused Water
In a small bowl, combine the 2.25 cups warm water (between 105-110°F) with the 1 tbsp granulated sugar and 2.25 tsp active dry yeast. Let it sit for 5-10 minutes until frothy—this confirms the yeast is alive and ready to work. The mixture should smell sweetly yeasty, not flat or sour.
While waiting, finely chop the 0.5 cup fresh rosemary and crack the 1.5 tsp black peppercorns using a mortar and pestle or rolling pin. The peppercorns will release their essential oils, intensifying the bread's warmth. Once the yeast mixture is bubbly, stir in the chopped rosemary and cracked peppercorns, letting them steep for another 5 minutes to infuse the water with their flavors.
Mix the Dough with Olive Oil and Aromatics
In a large mixing bowl, combine the 5 cups all-purpose flour and 2 tsp salt. Create a well in the center and pour in the yeast-rosemary-peppercorn infusion along with the 2 tbsp extra-virgin olive oil. Using a wooden spoon or dough whisk, gradually incorporate the dry ingredients into the wet, mixing until a shaggy dough forms.
Switch to your hands and knead the dough on a lightly floured surface for 8-10 minutes until smooth and elastic. The dough should spring back slowly when poked and feel slightly tacky but not sticky. If it's too dry, add 1 tsp warm water at a time; if too sticky, add 1 tbsp flour. The minced 4 cloves garlic should be added now—press them into the dough during the last minute of kneading to distribute their flavor evenly.
First Rise and Flavor Development
Lightly oil a large bowl, place the dough inside, and cover with a damp kitchen towel. Let it rise in a warm place (like a turned-off oven with a bowl of hot water) for 1.5-2 hours, or until doubled in size. The dough should feel spongy and jiggly when gently pressed—this indicates proper fermentation.
Here's where the magic happens: the yeast ferments the sugars, the rosemary and peppercorns release their oils, and the garlic mellows into a subtle sweetness. The dough will develop a delicate aroma—like a forest after rain with a hint of spice. Punch it down gently to release air, then divide into 4 equal portions (about 1 pound each) for shaping.
Shape and Second Rise with Cornmeal
Shape each dough portion into a 12-inch round boules or 10-inch oval loaves by pulling the edges toward the center and tucking them under. Place the shaped dough on a baking sheet dusted with 0.5 cup cornmeal, leaving space between each loaf. Cover loosely with plastic wrap and let rise for another 45-60 minutes until puffy and slightly domed.
The cornmeal creates a textured barrier that prevents sticking and adds a subtle crunch to the crust. Sprinkle each loaf with the 0.25 cup sesame seeds and 1.5 tsp coarse sea salt just before baking—this topping will caramelize beautifully, adding contrast to the soft interior. Preheat your oven to 425°F with a baking stone or inverted baking sheet inside for 30 minutes to ensure even heat distribution.
Bake to Golden Perfection with Steam
Five minutes before baking, place 1 cup ice cubes in a small metal bowl on the oven rack—this creates steam when they melt, crucial for developing a crisp crust. Transfer the loaves to the preheated oven and bake for 25-30 minutes until deep golden brown with a hollow sound when tapped on the bottom.
The bread should register 205-210°F internally. Immediately transfer to a wire rack to cool for at least 30 minutes—this prevents sogginess and allows the crust to set properly. The aroma at this stage is intoxicating: rosemary's herbal brightness, peppercorn's warmth, and garlic's depth all harmonizing in every slice. Serve warm with olive oil or your favorite spread for the ultimate experience.
Pro Tips For Making Artisan Bread Recipe Flavors
- Mix Yeast Last: I learned this the hard way—adding yeast to dry flour first kills half its power. Instead, dissolve it in warm water with sugar first, then let it foam for 5 minutes before folding it into the flour. That extra burst of activity makes all the difference in rise time.
- Use 110°F Water: Too hot and you kill the yeast; too cold and it won’t activate. Fill a measuring cup with warm water, let it sit for 5 minutes, then check—it should feel like a warm bath, not a sauna. A thermometer takes 10 seconds and saves you from flat dough.
- Skip the Over-Kneading: After burning three batches, I finally figured out: stop when the dough springs back slowly when poked. Overworking gluten makes bread dense. Wet your hands, press gently—if it doesn’t collapse immediately, you’re good. (Yes, even if it looks under-kneaded.)
- Salt the Water: I was skeptical until I tried it—dissolve the salt directly in the warm water with yeast and sugar. It distributes evenly and prevents uneven flavor. Plus, it’s one less step when mixing the dough. (Your future self will notice the difference.)
Storing and reheating this dish
Room-Temp Storage
Wrap your freshly baked artisan bread in a clean kitchen towel or beeswax wrap to preserve moisture and aroma. Place it in a burlap sack or wooden bread box at room temperature for up to 3-4 days.
The towel absorbs excess moisture while allowing airflow, preventing sogginess. I store mine on the countertop away from direct sunlight—this keeps the crust crisp and interior tender. 🌾
Freezer Preservation
For long-term storage, slice the bread and wrap each piece individually in parchment paper, then place in a freezer bag with all air squeezed out. Label with the date—this bread stays fresh for up to 3 months.
When ready to eat, toast directly from frozen in a toaster oven at 350°F for 5-7 minutes or reheat in a skillet over medium heat for 2-3 minutes per side. The flavors remain vibrant, and the crust gets crispy again. ❄️
Reheating Perfection
Revive stale slices by placing them in a preheated oven at 325°F for 8-10 minutes with a spritz of water (use a spray bottle). The steam reactivates the crust's crispness.
For quick fixes, wrap the bread in aluminum foil and warm in the oven for 5 minutes—this method works best for larger loaves. I also love reheating in a cast-iron skillet with a pat of butter for extra richness. 🔥
Crust Revival Tricks
If your bread's crust loses its crunch, place it in a brown paper bag and microwave for 10-15 seconds—the steam from the bag will restore crispiness.
For a stovetop method, heat a dry skillet over medium heat for 1 minute, then place the bread cut-side down for 30 seconds per side. This technique works wonders for toasting thick slices. The key is speed—overheating can dry out the interior. ✨
Flavor Retention Tips
To maintain the rosemary, garlic, and peppercorn flavors, store the bread in an airtight container with a damp paper towel on top. The towel adds moisture without making the bread soggy.
For extra protection, place a small bowl of rice in the container—it absorbs excess moisture and keeps the bread fresh longer. I’ve found this method extends freshness by an extra day or two. 💫
Nutrition facts
Frequently asked questions about artisan bread flavors
Can I substitute dried herbs for fresh in this recipe?
Yes, but use one-third the amount of dried herbs compared to fresh. For example, if the recipe calls for 0.5 cup fresh rosemary, use just 1.5 tablespoons dried rosemary. Dried herbs are more concentrated, so they pack a stronger punch.
How do I prevent my artisan bread from tasting bland?
Flavor development happens during fermentation! Let your dough rise for the full 12-16 hours in the fridge—this deepens the taste. Also, use high-quality olive oil (not vegetable oil) and freshly cracked peppercorns instead of pre-ground. The longer fermentation also enhances the rosemary and garlic flavors naturally.
What's the best way to add cheese to this bread?
For a cheesy twist, mix 1 cup shredded cheese (like Gruyère or Parmesan) into the dough during the last minute of kneading. Or create a topping by sprinkling cheese on shaped loaves before baking. Use mozzarella or feta for meltiness or Parmesan for nutty crunch. Just reduce the sesame seeds by 2 tablespoons to balance textures.
Why did my bread turn out dense instead of airy?
Dense bread usually means underproofing or overworking the dough. Make sure your yeast is active (it should foam in 5-10 minutes in warm water). Also, don't over-knead—stop when the dough springs back slowly when poked. For extra lift, try adding 1 teaspoon baking soda to the dough (but reduce salt by 0.5 teaspoon).
Can I make this bread without a Dutch oven?
Place your shaped loaves on a baking sheet lined with parchment paper. For steam, add 1 cup ice cubes to a metal bowl on the oven rack when you put the bread in. Alternatively, spray the oven walls with water before baking. The crust won't be as crispy as with a Dutch oven, but it'll still be delicious.